Note: for passing the Google review, we had to enable the Container Analysis API:
PROJECT=jetstack-public
gcloud services --project=$PROJECT enable containeranalysis.googleapis.com
Contents:
- Cutting a new release
- Pricing mechanism
- Creating and testing the deployer image
- mpdev install on your own cluster
- Testing the application without having access to the Billing API
- How the Application object "wrangles" its components
- Installing and manually testing the deployer image
- Testing and releasing the deployer using Google Cloud Build
- Updating the upstream cert-manager chart version
Since the process is manual and evolves from release to release, we document all
the steps that were taken in each release directly on the GitHub Release itself
in a <details> block that looks like this:
▶ 📦 Recording of the manual steps of the release process
Imagining that you want to release 1.1.0-gcm.5, the steps are:
-
Copy the
<details>block from the previous release 1.1.0-gcm.4 -
In an editor, change the references to
1.1.0-gcm.4. -
Follow the steps and tick the checkboxes.
-
After the
1.1.0-gcm.5is pushed to GitHub, create a GitHub Release for that tag and paste the content into the<details>block into the GitHub Release you just created (seePASTE HEREbelow). The GitHub Release description should look like this:## Changelog <!-- TODO --> ## Notes <details> <summary>📦 Recording of the manual steps of the release process</summary> <!-- PASTE HERE --> </details>
Each cluster is priced at $50 a month, billed hourly ($0.07/hour). The way the
hourly billing works is by running ubbagent which is set as a side-car
container to the cert-manager controller
deployment.
The ubbagent pings the Google Billing API every hour; each ping will add a value
of 1 to the time value. The unit for time is something we have configured
in the pricing
panel.
| Field | Value |
|---|---|
| ID | time |
| Unit | h |
Note that the cert-manager deployment should always be run with replicas=1. High-availability (replicas > 1) is not supported yet, and the application will be billed for each replica on the cluster.
The ubbagent's ping period is configured using the intervalSeconds field (in
seconds!) in the
billing-agent-config.yml
that looks like:
# File: billing-agent-config.yml

# The metrics section defines the metric that will be reported.
# Metric names should match verbatim the identifiers created
# during pricing setup.
metrics:
  - name: time
    type: int
    endpoints:
      - name: servicecontrol

# The endpoints section defines where metering data is ultimately
# sent. Currently supported endpoints include:
# * disk - some directory on the local filesystem
# * servicecontrol - Google Service Control
endpoints:
  - name: servicecontrol
    servicecontrol:
      identity: gcp
      # This service name comes from the service name that Google gave us in
      # jetstack-secure-for-cert-manager.yaml (see below).
      serviceName: jetstack-secure-for-cert-manager.mp-jetstack-public.appspot.com
      consumerId: $AGENT_CONSUMER_ID

# The sources section lists metric data sources run by the agent
# itself. The currently-supported source is 'heartbeat', which
# sends a defined value to a metric at a defined interval.
sources:
  - name: instance_time_heartbeat
    heartbeat:
      # The heartbeat sends a 1-hour value through the "time" metric every
      # hour.
      metric: time
      intervalSeconds: 3600
      value:
        int64Value: 1
For information, here is the jetstack-secure-for-cert-manager.yaml that was
provided to us; this
file contains the name of the "services" that can be used in the above
billing-agent-config.yml:
# This manifest is called jetstack-secure-for-cert-manager.yaml and was
# provided by Google on 5 March 2021 in an onboarding email.
# See: https://github.com/jetstack/platform-board/issues/347.

type: google.api.Service
config_version: 3
name: jetstack-secure-for-cert-manager.mp-jetstack-public.appspot.com
title: "Jetstack Ltd. Jetstack Secure for cert-manager Reporting Service"
producer_project_id: mp-jetstack-public

control:
  environment: servicecontrol.googleapis.com

metrics:
  - name: jetstack-secure-for-cert-manager.mp-jetstack-public.appspot.com/time
    metric_kind: DELTA
    value_type: INT64
    unit: h

billing:
  metrics:
    - jetstack-secure-for-cert-manager.mp-jetstack-public.appspot.com/time
  rules:
    - selector: "*"
      allowed_statuses:
- currentThe deployer image is only used when the Jetstack Secure for cert-manager is deployed in through the UI; it is not used for when installing the application through the CLI.
The deployer image embeds everything that is required for applying the correct Kubernetes manifests to deploy the Jetstack Secure for cert-manager application. In our case, the image embeds:
- The
helmtool, - The Helm charts for cert-manager, google-cas-issuer and preflight.
There are two deployer tags:
# The main moving tag required by the Marketplace UI:
marketplace.gcr.io/jetstack-public/jetstack-secure-for-cert-manager/deployer:1.1

# A static tag for debugging purposes:
marketplace.gcr.io/jetstack-public/jetstack-secure-for-cert-manager/deployer:1.1.0-gcm.1
The minor tag 1.1 (for example) is the tag that the Marketplace UI needs.
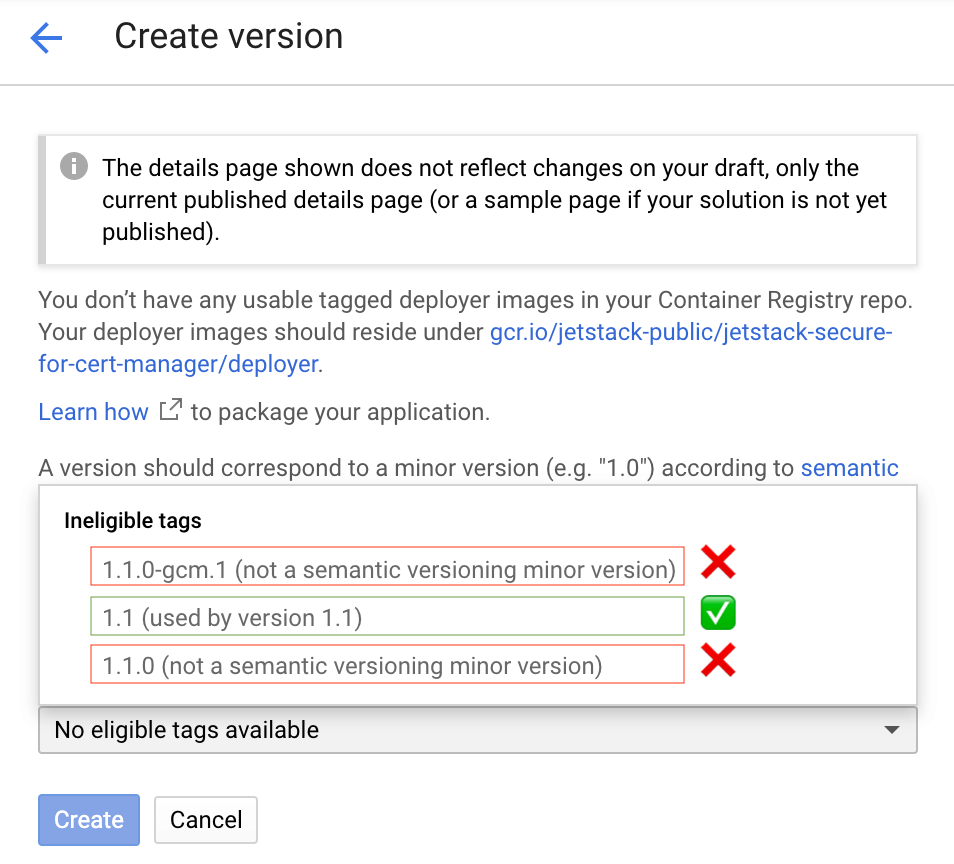
The other tags (e.g., 1.1.0 or 1.1.0-gcm.1) cannot be used for the
Marketplace UI:
A version should correspond to a minor version (e.g.
1.0) according to semantic versioning (not a patch version, such as1.1.0). Update the same version for patch releases, which should be backward-compatible, instead of creating a new version.
In the below screenshot, we see that both the deployer tags 1.1.0 and
1.1.0-gcm.1 are "refused" by the UI:
Note that we only push full tags (e.g., 1.1.0-gcm.1) for all the other
images. For example, let us imagine that deployer:1.1 was created with
this schema.yaml:
# schema.yaml
x-google-marketplace:
  publishedVersion: "1.1.0-gcm.1"
This means that although the deployer image says 1.1, the tags used in
the helm release will be using the tag 1.1.0-gcm.1; the images used in
the pods will look like this:
marketplace.gcr.io/jetstack-public/jetstack-secure-for-cert-manager:1.1.0-gcm.1
marketplace.gcr.io/jetstack-public/jetstack-secure-for-cert-manager/cert-manager-acmesolver:1.1.0-gcm.1
marketplace.gcr.io/jetstack-public/jetstack-secure-for-cert-manager/cert-manager-cainjector:1.1.0-gcm.1
marketplace.gcr.io/jetstack-public/jetstack-secure-for-cert-manager/cert-manager-google-cas-issuer:1.1.0-gcm.1
marketplace.gcr.io/jetstack-public/jetstack-secure-for-cert-manager/cert-manager-preflight:1.1.0-gcm.1
marketplace.gcr.io/jetstack-public/jetstack-secure-for-cert-manager/cert-manager-webhook:1.1.0-gcm.1
marketplace.gcr.io/jetstack-public/jetstack-secure-for-cert-manager/deployer:1.1.0-gcm.1
marketplace.gcr.io/jetstack-public/jetstack-secure-for-cert-manager/preflight:1.1.0-gcm.1
marketplace.gcr.io/jetstack-public/jetstack-secure-for-cert-manager/smoke-test:1.1.0-gcm.1
marketplace.gcr.io/jetstack-public/jetstack-secure-for-cert-manager/ubbagent:1.1.0-gcm.1
Upgrades for patch or build versions (e.g., moving from 1.1.0-gcm.1 to
1.1.0-gcm.2, or from 1.1.0-gcm.1 to 1.1.1-gcm.1) work like this:
- We update the
publishedVersionin schema.yaml; - Then, we push a new
deployer:1.1(i.e,1.1is a moving tag); - The user of the Click-to-deploy solution will have to re-deploy using
the same
1.1to get the upgrade.
As a recap about image tags, here is what the tags look like now, taking
1.1.0-gcm.1 as an example:
# The deployer and tester images is built and pushed in cloudbuild.yaml:
gcr.io/jetstack-public/jetstack-secure-for-cert-manager/deployer:1.1
gcr.io/jetstack-public/jetstack-secure-for-cert-manager/deployer:1.1.0-gcm.1
gcr.io/jetstack-public/jetstack-secure-for-cert-manager/smoke-test:1.1.0-gcm.1

# These images are manually pushed (see below command):
gcr.io/jetstack-public/jetstack-secure-for-cert-manager:1.1.0-gcm.1 # this is cert-manager-controller
gcr.io/jetstack-public/jetstack-secure-for-cert-manager/cert-manager-acmesolver:1.1.0-gcm.1
gcr.io/jetstack-public/jetstack-secure-for-cert-manager/cert-manager-cainjector:1.1.0-gcm.1
gcr.io/jetstack-public/jetstack-secure-for-cert-manager/cert-manager-google-cas-issuer:1.1.0-gcm.1
gcr.io/jetstack-public/jetstack-secure-for-cert-manager/cert-manager-webhook:1.1.0-gcm.1
gcr.io/jetstack-public/jetstack-secure-for-cert-manager/preflight:1.1.0-gcm.1
gcr.io/jetstack-public/jetstack-secure-for-cert-manager/ubbagent:1.1.0-gcm.1
Here is the command I did to retag all google-review images to
1.1.0-gcm.2 since we don't have yet automated Google-OSPO-compliant image
(will be done in
#10):
retag() { # Usage: retag FROM_IMAGE_WITH_TAG TO_IMAGE_WITH_TAG
  local FROM=$1 TO=$2
  docker pull $FROM && docker tag $FROM $TO && docker push $TO
}
retagall() { # Usage: retagall FROM_REGISTRY FROM_TAG TO_REGISTRY TO_TAG
  local FROM=$1 TO=$2 FROM_TAG=$3 TO_TAG=$4
  retag $FROM:$FROM_TAG $TO:$TO_TAG || exit 1
  retag $FROM/cert-manager-acmesolver:$FROM_TAG $TO/cert-manager-acmesolver:$TO_TAG || exit 1
  retag $FROM/cert-manager-cainjector:$FROM_TAG $TO/cert-manager-cainjector:$TO_TAG || exit 1
  retag $FROM/cert-manager-webhook:$FROM_TAG $TO/cert-manager-webhook:$TO_TAG || exit 1
  retag $FROM/cert-manager-google-cas-issuer:$FROM_TAG $TO/cert-manager-google-cas-issuer:$TO_TAG || exit 1
  retag $FROM/preflight:$FROM_TAG $TO/preflight:$TO_TAG || exit 1
  retag gcr.io/cloud-marketplace-tools/metering/ubbagent:latest $TO/ubbagent:$TO_TAG || exit 1
}
APP_VERSION=1.1.0-gcm.2
retagall gcr.io/jetstack-public/jetstack-secure-for-cert-manager{,} google-review $APP_VERSIONFirst, let us choose a deployer that we want to use. For example, let us
use the existing deployer image 1.1.0-gcm.1:
APP_VERSION=1.1.0-gcm.1Let us imagine your cluster is in the project foobar. In order to be able
to install the application on your own cluster using mpdev, you will have
to re-push all the images as well as the deployer to foobar:
retag() { # Usage: retag FROM_IMAGE_WITH_TAG TO_IMAGE_WITH_TAG
  local FROM=$1 TO=$2
  docker pull $FROM && docker tag $FROM $TO && docker push $TO
}
retagall() { # Usage: retagall FROM_REGISTRY FROM_TAG TO_REGISTRY TO_TAG
  local FROM=$1 TO=$2 FROM_TAG=$3 TO_TAG=$4
  retag $FROM:$FROM_TAG $TO:$TO_TAG || exit 1
  retag $FROM/cert-manager-acmesolver:$FROM_TAG $TO/cert-manager-acmesolver:$TO_TAG || exit 1
  retag $FROM/cert-manager-cainjector:$FROM_TAG $TO/cert-manager-cainjector:$TO_TAG || exit 1
  retag $FROM/cert-manager-webhook:$FROM_TAG $TO/cert-manager-webhook:$TO_TAG || exit 1
  retag $FROM/cert-manager-google-cas-issuer:$FROM_TAG $TO/cert-manager-google-cas-issuer:$TO_TAG || exit 1
  retag $FROM/preflight:$FROM_TAG $TO/preflight:$TO_TAG || exit 1
  retag gcr.io/cloud-marketplace-tools/metering/ubbagent:latest $TO/ubbagent:$TO_TAG || exit 1
}

PROJECT=$(gcloud config get-value project | tr ':' '/')
retag gcr.io/{jetstack-public,$PROJECT}/jetstack-secure-for-cert-manager:$APP_VERSION
retagall gcr.io/{jetstack-public,$PROJECT}/jetstack-secure-for-cert-manager google-review $APP_VERSION
We can run mpdev install:
kubectl create ns test-1
mpdev install --deployer=gcr.io/$PROJECT/jetstack-secure-for-cert-manager/deployer:$APP_VERSION \
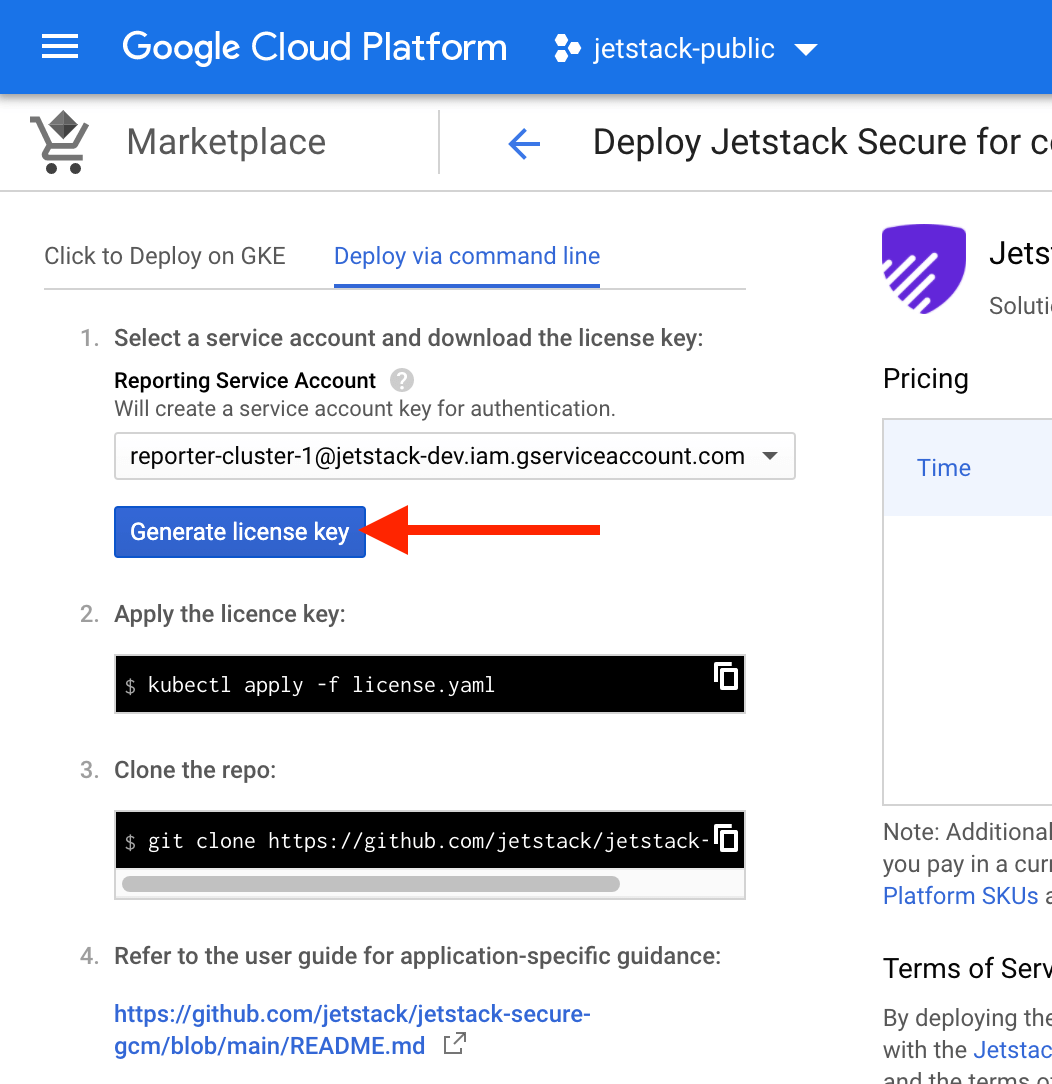
--parameters='{"name": "test-1", "namespace": "test-1"}'Then, download a license.yaml key (can be from any project on an
organization, as long as the IT dept has already "Purchased" the
application once for one of the projects). If you are at Jetstack, you own
project (e.g., jetstack-mael-valais) will work out of the box since the
IT team already did the "Purchase"
step.
Finally, do:
cat license.yaml | sed 's/name:.*/name: test-1-license/' | k apply -f- -n test-1If you go to GKE's applications page, you should see everything green:

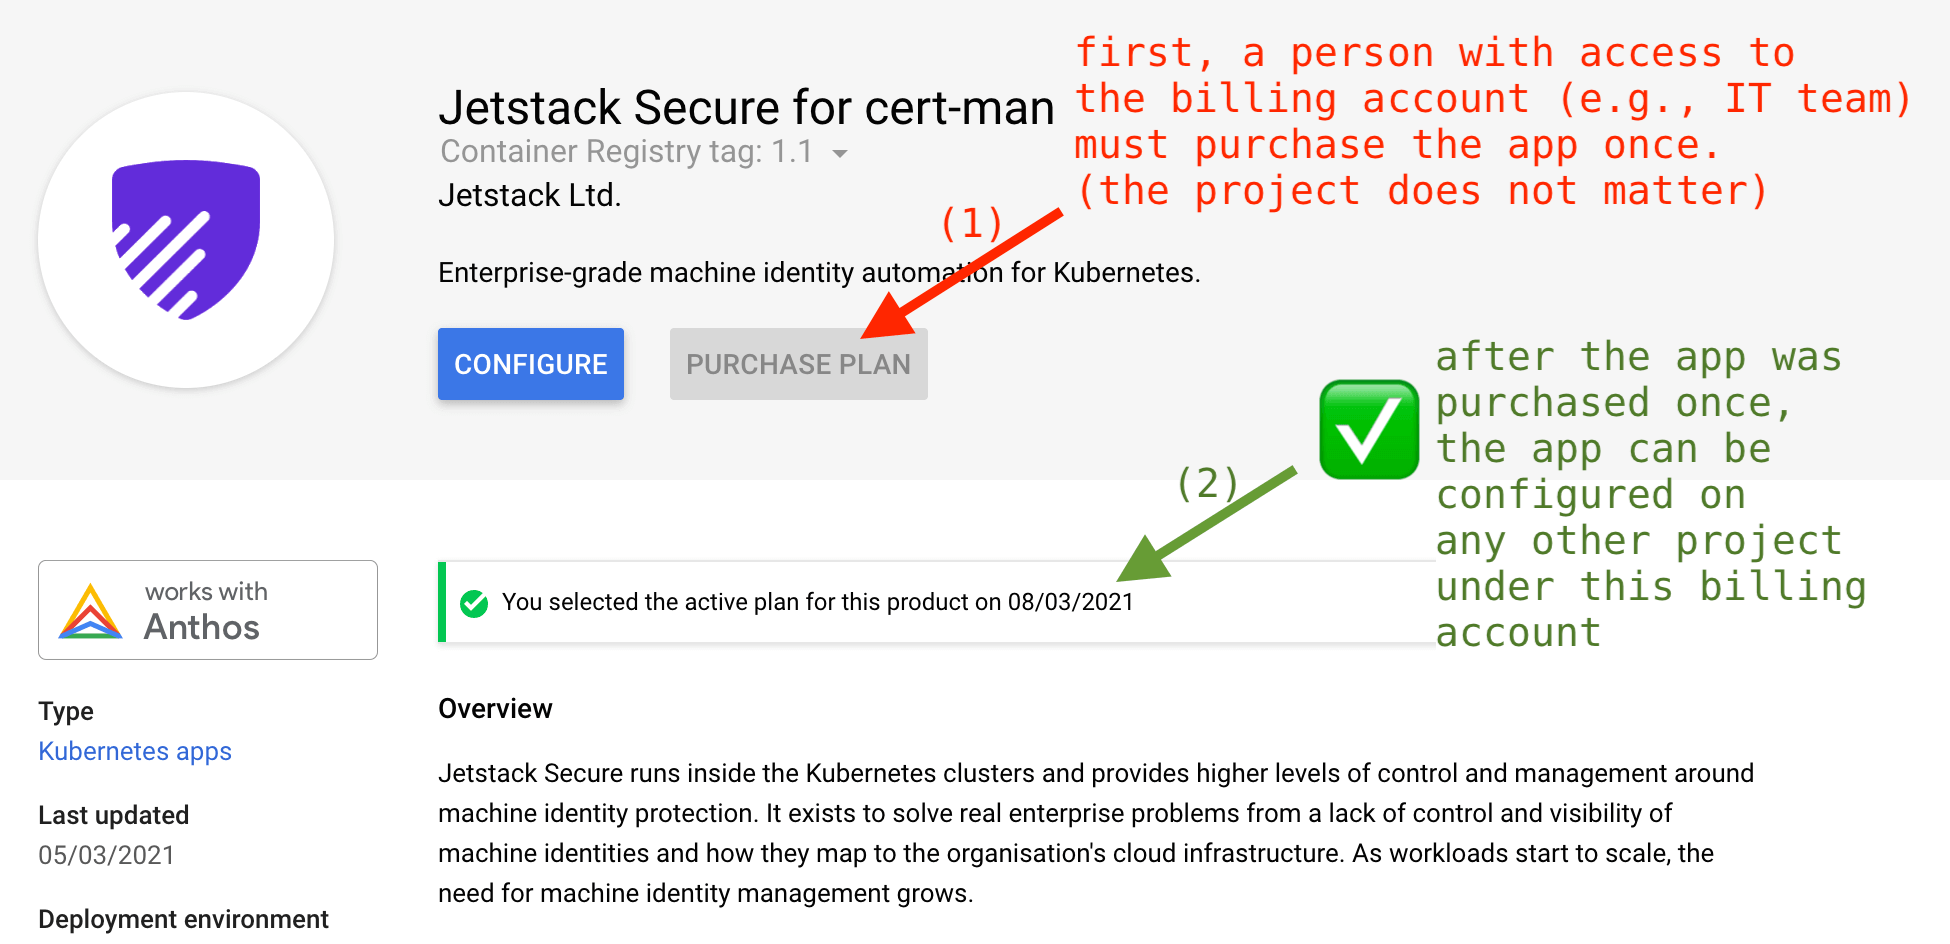
Jetstack members do not have access to the Billing API. In order to test
the UI and CLI flows, the IT team needs to "Purchase" the application. It
does not matter which project, the only important bit is that have the
application purchased. Then, any project that is attached to that same
billing account will be able to "Configure" the application on their own
project, e.g. on jetstack-mael-valais.
In order to display its components (Pods, Deployments, ConfigMap, Secret,
CRD, Mutating and Validating webhook), the Application uses a label
selector. The official Application
API
reminds us that the app.kubernetes.io/name must be used. So we use both
the name and instance recommended
labels:
# https://github.com/jetstack/jetstack-secure-gcm/blob/main/chart/jetstack-secure-gcm/templates/application.yaml
kind: Application
spec:
  selector:
    matchLabels:
      app.kubernetes.io/name: { { .Chart.Name } } # Will always be "jetstack-secure-gcm"
      app.kubernetes.io/instance: { { .Release.Name } } # Example: "jetstack-secure-for-cert-mana-2"
Then, we use the nameOverride and fullnameOverride:
nameOverridemakes sure that all the objects across all subcharts have the following label:app.kubernetes.io/name: "jetstack-secure-gcm"
fullnameOverridemakes sure that the object names actually make sense; if we did not use this, we would end up with duplicate names in deployments and services.
# https://github.com/jetstack/jetstack-secure-gcm/blob/main/chart/jetstack-secure-gcm/values.yaml
cert-manager:
  nameOverride: jetstack-secure-gcm
  fullnameOverride: jetstack-secure-gcm
google-cas-issuer:
  nameOverride: jetstack-secure-gcm
  fullnameOverride: google-cas-issuer
preflight:
  nameOverride: jetstack-secure-gcm
  fullnameOverride: preflight
Then we make sure all the objects are set with the labels:
# All the manifests and subcharts under
# https://github.com/jetstack/jetstack-secure-gcm/blob/main/chart/jetstack-secure-gcm/templates
metadata:
  app.kubernetes.io/name: "{{ .Chart.Name }}" # Will be "jetstack-secure-gcm" due to the name override
app.kubernetes.io/instance: "{{ .Release.Name }}" # Example: "jetstack-secure-for-cert-mana-2"First, let us set a couple of variables:
CLUSTER=smoke-test
LOCATION=europe-west2-b
PROJECT=$(gcloud config get-value project | tr ':' '/')
REGISTRY=gcr.io/$PROJECT
SOLUTION=jetstack-secure-for-cert-manager
In order to have the google-cas-issuer working, we need to enable workload identity. Let's create a cluster that has the workload identity enabled:
gcloud container clusters create $CLUSTER --region $LOCATION --num-nodes=1 --preemptible \
  --workload-pool=$PROJECT.svc.id.goog
Then, build and push the deployer image:
docker build --tag $REGISTRY/$SOLUTION/deployer:1.1.0-gcm.1 .
docker push $REGISTRY/$SOLUTION/deployer:1.1.0-gcm.1
Finally, use mpdev to install jetstack-secure to the test-ns namespace:
# If you don't have it already, install mpdev:
docker run gcr.io/cloud-marketplace-tools/k8s/dev cat /scripts/dev > /tmp/mpdev && install /tmp/mpdev ~/bin

kubectl create ns test-ns
kubectl apply -f https://raw.githubusercontent.com/GoogleCloudPlatform/marketplace-k8s-app-tools/master/crd/app-crd.yaml
mpdev install --deployer=$REGISTRY/$SOLUTION/deployer --parameters='{"name": "test-ns", "namespace": "test"}'
Now, we need to have access to a CAS root. To create a "root" certificate authority as well as an intermediate certificate authority ("subordinate") in your current Google project, run:
gcloud config set privateca/location us-east1
gcloud beta privateca roots create my-ca --subject="CN=root,O=my-ca"
gcloud beta privateca subordinates create my-sub-ca  --issuer=my-ca --location us-east1 --subject="CN=intermediate,O=my-ca,OU=my-sub-ca"
It is recommended to create subordinate CAs for signing leaf certificates. See the official documentation.
At this point, the Kubernetes service account created by mpdev still does
not have sufficient privileges in order to access the Google CAS API. We
have to "bind" the Kubernetes service account with a new GCP service
account that will have access to the CAS API.
gcloud iam service-accounts create sa-google-cas-issuer
gcloud beta privateca subordinates add-iam-policy-binding my-sub-ca \
  --role=roles/privateca.certificateRequester \
  --member=serviceAccount:sa-google-cas-issuer@$PROJECT.iam.gserviceaccount.com
gcloud iam service-accounts add-iam-policy-binding sa-google-cas-issuer@$PROJECT.iam.gserviceaccount.com \
  --role roles/iam.workloadIdentityUser \
  --member "serviceAccount:$PROJECT.svc.id.goog[test-ns/test-google-cas-issuer-serviceaccount-name]"
kubectl annotate serviceaccount -n test-ns test-google-cas-issuer-serviceaccount-name \
iam.gke.io/gcp-service-account=sa-google-cas-issuer@$PROJECT.iam.gserviceaccount.comWe use gcloud builds in order to automate the release process. Cloud
Build re-publishes the cert-manager images to your project and builds,
tests and pushs the deployer image.
Requirements before running gcloud builds:
-
Set a few variables:
PROJECT=jetstack-public
CLUSTER=smoke-test
LOCATION=europe-west2-b
-
Enable the necessary Google APIs on your project. To enable them, you can run the following:
gcloud services --project=$PROJECT enable cloudbuild.googleapis.com
gcloud services --project=$PROJECT enable container.googleapis.com
gcloud services --project=$PROJECT enable containerregistry.googleapis.com
gcloud services --project=$PROJECT enable storage-api.googleapis.com
-
You need a GKE cluster with workload-identity enabled. You can either update your existing cluster or create a new cluster with workload identity enabled with this command:
export CLUSTER=smoke-test
export LOCATION=europe-west2-b
export PROJECT=$(gcloud config get-value project | tr ':' '/')
gcloud container clusters create $CLUSTER --region $LOCATION --num-nodes=1 --preemptible \
  --workload-pool=$PROJECT.svc.id.goog
-
A Google CAS root and subordinate CA as well as a Google service account that will be "attached" to the Kubernetes service account that will be created by the deployer:
gcloud beta privateca roots create my-ca --subject="CN=root,O=my-ca"
gcloud beta privateca subordinates create my-sub-ca  --issuer=my-ca --location $LOCATION --subject="CN=intermediate,O=my-ca,OU=my-sub-ca"
gcloud iam service-accounts create sa-google-cas-issuer
gcloud beta privateca subordinates add-iam-policy-binding my-sub-ca \
  --role=roles/privateca.certificateRequester \
  --member=serviceAccount:sa-google-cas-issuer@$PROJECT.iam.gserviceaccount.com
gcloud iam service-accounts add-iam-policy-binding sa-google-cas-issuer@$PROJECT.iam.gserviceaccount.com \
  --role roles/iam.workloadIdentityUser \
  --member "serviceAccount:$PROJECT.svc.id.goog[test-ns/test-google-cas-issuer-serviceaccount-name]"
Note: the last step which is adding the annotation to the google-cas-issuer Kubernetes service account is done in
cloudbuild.yml. The annotation will look like:metadata: annotations: iam.gke.io/gcp-service-account=sa-google-cas-issuer@PROJECT_ID.iam.gserviceaccount.com
-
Go to IAM and Admin > Permissions for project and configure the
0123456789@cloudbuild.gserviceaccount.comservice account with the following roles so that it has permission to deploy RBAC configuration to the target cluster and to publish it to a bucket:Cloud Build Service AgentKubernetes Engine AdminStorage Object Admin
-
Create a bucket in the same project as your cluster. The bucket must have the same name as your project. To create it, run the following:
gsutil mb -p $PROJECT gs://$PROJECT
Then, you can trigger a build:
gcloud builds submit --project $PROJECT --timeout 1800s --config cloudbuild.yaml \
  --substitutions _CLUSTER_NAME=$CLUSTER,_CLUSTER_LOCATION=$LOCATION
This will run [mpdev verify](Google Cloud Marketplace verification
tool),
which runs smoke tests.
Note that debugging mpdev verify is quite tricky. In order to inspect the
state of the namespace created by mpdev verify, we can artificially pause
mpdev verify when it tries to delete the application:
There is no official spec for the smoke-test.yaml file, although there is
the example suite.yaml:
actions:
  - name: "{{ .Env.TEST_NAME }}"
    httpTest:
      url: http://{{ .Var.MainVmIp }}:9012
      expect:
        statusCode:
          equals: 200
        statusText:
          contains: OK
        bodyText:
          html:
            title:
              contains: Hello World!
  - name: Update success variable
    gcp:
      setRuntimeConfigVar:
        runtimeConfigSelfLink: https://runtimeconfig.googleapis.com/v1beta1/projects/my-project/configs/my-config
        variablePath: status/success
        base64Value: c3VjY2Vzcwo=
  - name: Can echo to stdout and stderr
    bashTest:
      script: |-
        echo "Text1"
        >2& echo "Text2"
      expect:
        exitCode:
          equals: 0
          notEquals: 1
        stdout:
          contains: "Text1"
          notContains: "Foo"
          matches: "T.xt1"
        stderr:
          contains: "Text2"
          notContains: "Foo"
          matches: "T.xt2"
Unfortunately, the stdout or stderr output won't be shown whenever a
step fails. Reason: the
logic in bash.go
first checks the status code and returns if mismatch, then checks the
stdout and returns if mismatch, and finally checks stderr.
Workaround:: add to smoke-test.yaml a step that hangs, e.g.:
- name: hang for debugging purposes
  bashTest:
    script: sleep 1200
then you can exec into the snoke-test pod and debug around.
From building-deployer-helm.md, bump the version of the cert-manager chart in requirements.yaml. Then:
helm repo add jetstack https://charts.jetstack.io
helm dependency build chart/jetstack-secure-gcm